Saturday, January 7, 2012

Hello from the land of pop, hot dish and bubblers

... otherwise known as the Midwest!
I'm Emma, and I didn't stray quite as far from home as these other two ladies, as I'm currently living it up in Minnesota.  I guess I'm the hippie/nerd of the group, getting way more excited than normal about biking to work in the dead of winter, cooking with weird foods like coconut oil and chia seeds (yes, the same ones that grow into chia pets), and discussions about sustainable agriculture.  Just like my friends, I absolutely loooooooove food -- eating it, making it, looking at pictures of it... I got a food processor for Christmas and just about died of happiness.


Cinnamon rolls from this recipe


I'm really interested in nutrition, and I love the challenge of coming up with healthy meals for one on a college student's tight budget of money and time.  Still, I have a major sweet tooth and I relish the days when I have time to make delicious sweet treats.


I work at a coffee shop that sometimes requires me to work reaalllly early in the morning -- so early there's no way I'm setting the alarm clock back an extra 15 minutes to make a pot of oatmeal-- but I don't like to miss out on making breakfast, my favorite meal of the day! 
Thankfully, I've come up with a few great breakfast recipes that are ready to eat in the morning before work!  They require a little bit of preparation beforehand, but making breakfast is the perfect homework break when you're already in the kitchen scrounging for study snacks at night.
Here are a couple of my favorite oatmeal breakfasts:

Overnight Oatmeal
1/3 cup rolled oats
1/3 cup milk (or nondairy milk)
1/3 cup yogurt (I use plain, but flavored would be yummy too!)
~1/8 tsp vanilla
pinch salt

Mix all ingredients together in an empty jar (I use my old peanut butter jars), cap the jar, and place in the fridge overnight.  In the morning, the oats will have soaked up the liquid and will be soft and delicious!

Slow-cooker Steel cut Oats
heaping 1/4 cup steel cut oats
1.5 cups water, milk, or nondairy milk
~1/8 tsp vanilla
pinch salt 

Mix all ingredients in a glass jar (again, empty peanut butter jars come in really handy!) and set in a slow-cooker without capping the jar.  Fill the slow-cooker with enough water that it comes to about halfway up the jar.  Set the slow-cooker on low heat, and go to sleep.  In the morning, the oats will be cooked and creamy!  

Both of these are basic recipes that you can play around with by mixing in different additions.  Some combinations I've come up with:
  • mashed banana, cocoa powder, and a scoop of peanut butter
  • raisins, walnuts, and a sprinkle of cinnamon
  • canned pumpkin, dried cranberries, and a pinch each of ginger, cinnamon, and cloves
  • raspberry jam and peanut butter
  • shredded carrots, dried coconut, and a bit of maple syrup 
  • peanut butter, dark chocolate chips, and crumbled pretzels
  • ... the possibilities are endless!  Experiment with adding some ingredients at night, and others that you don't want to get soggy (like granola or pretzels) in the morning before you dig in.
Happy oatmeal-ing! 

Thursday, January 5, 2012

West Coast is where it's at!

This would be me!
Well, hello!  I'm Juliette, and I happen to be livin' it large out in California, so I assume responsibility of the West Coast chapter of this blog! A little about me... I'm the artsty, chill, yet occasionally sassy one.  Recently when I haven't been running, taking a nap, or doing the whole school thing, I've been trying out some new things in the kitchen.  Warning: I am most definitely the least experienced with this whole baking/cooking/creating food thing compared to these two other ladies, but I have an intense love for food and have recently become a little obsessed with photographing beautiful kitchen creations.  Tasty food is even better when it looks beautiful!  I'm excited to share my experiences as a novice cook/baker and photographer with both Kate and Emma, and of course YOU!

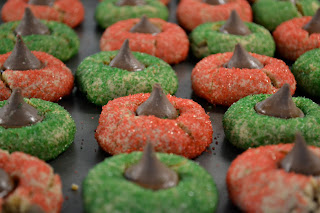
I haven't been as ambitious as Kate with my winter break... but I just made a batch of simple, yet always mouth-watering peanut butter kiss cookies!  Since peanut butter cookies are my favorite, I suppose it's fitting to start off my part in this blog with them.  Earlier before winter break I made some with my friend Kristen back at school which were rolled in red and green sprinkles instead of sugar (if you're looking to be extra festive).  If you haven't tried these yet, you gotta!
                                                                                               
      "Peanut Butter Blossoms"
(adapted recipe from www.herseys.com)

48 herseys kisses (I used dark chocolate this last time!)
3/4 cup peanut butter (natural peanut butter actually works well for these)
1/3 cup light brown sugar
2 tablespoons milk
1 & 1/2 cups all-purpose flour
1/2 teaspoon salt
1/2 cup butter
1/3 cup granulated sugar
1 egg
1 teaspoon vanilla extract
1 teaspoon baking soda
Granulated sugar or sprinkles


 1. Heat oven to 375*F.


2. Beat butter and peanut butter in a large bowl until well blended.  Add 1/3 cup granulated sugar and brown sugar; beat until fluffy.  Add egg, milk, vanilla; beat well.  Stir together flour, baking soda and salt; gradually beat into peanut butter mixture.


3. Shape dough into 1-inch balls.  Roll in granulated sugar or sprinkles; place on ungreased cookie sheet.


4. Bake 8 to 10 minutes or until lightly browned.  Immediately press a chocolate into center of each cookie (cookie will probably crack a little around the edge).  Remove from cookie sheet to wire rack.  Let cookies cool completely before enjoying!  Makes about 4 dozen cookies.


Wednesday, January 4, 2012

Blogger up! East Coast Chapter

Me. Obviously.
     So as many of you may have noticed there are three of us writing this blog. Strangely enough, although we all grew up in the same place, we're currently living as far away from each other as is possible. I get to be the East Coast Chapter. Pretty exciting. It's almost like a "Switched at Birth" episode. But with food, not children. And pictures.   
Holiday decorations 
      For those of you who don't know me. I'm Kate, the weird, entertaining, sometimes-makes-too-many-dirty-jokes one of the bunch. As my mother would probably say in response, thank god these blog posts are mainly in pictures or we'd probably be here a while. She's probably right. I also ended up being the one with the short attention span, so apologies in advance if any of my dishes look half finished or undecorated. I assure you they taste good. Aesthetic appeal is not one of my strengths.     
Rum balls
     For my first installment I decided to feature some of the delicious treats my brother and I made for Christmas/Hannukah/Insert-any-holiday-you-want-to-celebrate-by-drinking party. Over the holidays, I had a lovely philanthropic visit from the white-haired man in red (not Ron Paul) and received a wonderful new camera that takes wonderful pictures of food. Perfect timing. Enjoy!


Ginger molasses cookies


Lemon bars garnished with fresh fruit
       Recipe for lemon bars 
(courtesy of allrecipes.com with my own additions)


  • 1 1/2 cups all-purpose flour
  • 2/3 cup confectioners' sugar
  • 1/2 (1 stick) butter and 1/4 cup oil
  • 2 teaspoons vanilla
  • 3 eggs
  • 1 1/2 cups white sugar
  • 3 tablespoons all-purpose flour
  • 1/4 cup lemon juice (fresh squeezed is best!)
  • 2-3 tsp lemon zest (if you used fresh lemons)
  • 1/3 cup confectioners' sugar for decoration!
  • fruit for decoration


    1. Preheat the oven to 375 degrees F (190 degrees C). Grease a 9x13 inch baking pan.
    2. Combine the flour, 2/3 cup confectioners' sugar, and butter. Pat dough into prepared pan.
    3. Bake for 20 minutes in the preheated oven, until slightly golden. While the crust is baking, whisk together eggs, white sugar, flour, and lemon juice until frothy. Pour this lemon mixture over the hot crust.
    4. Return to the preheated oven for an additional 20 to 25 minutes, or until light golden brown. Cool on a wire rack. Dust the top with confectioners' sugar. Cut into squares.

If you give a mouse a cookie...

He'll eat it.

And that's what we're doing. Taking pictures of mice eating cookies. 

Enjoy.

Don't pee your pants.